How Can You White-Label Your Community Under Your Own Domain?
Overview
Use this guide when you want your Community Media Network to live fully under your own brand domain.
White-labeling allows you to host your community on your own URL instead of a shared or platform-branded link. Inside the Brand Control Center, this configuration gives you full brand ownership, tighter control, and a seamless user experience.
If you’re serious about operating your network as a core business asset, not just a feature - white-labeling is a foundational step.
What You’ll Do
- Configure a custom domain for your community
- Align Production and QA environments
- Ensure brand consistency across user touchpoints
- Maintain full control over experience and data
What Does White-Labeling Mean?
White-labeling your community means:
- Hosting it under your own domain
- Removing external platform branding
- Delivering a fully brand-native experience
To your users, it feels like a natural extension of your website or app, not a separate tool.
This strengthens credibility and improves discoverability through search engines.
Why Should You White-Label Your Community?
Who this is for
Retailers, publishers, and commerce teams operating a brand-owned Community Media Network.
What problem this solves
Fragmented experiences weaken brand trust and reduce engagement.
White-labeling ensures your community feels fully integrated into your brand ecosystem.
What You Gain
Brand Consistency: Deliver a unified visual and navigational experience across all user journeys.
Customized Experience: Control how your community appears and behaves under your domain.
Stronger Engagement: Users are more likely to participate when the experience feels native and trustworthy.
Ownership & Control: Maintain control over data, interactions, and feature evolution.
Monetization Flexibility: Activate sponsorships, memberships, or commerce integrations without redirecting users off your brand.
White-labeling shifts your community from “hosted platform” to “owned media asset.”
How to White-Label Your Community
Step 1 - Log in to Brand Control Center
Access your account through the Brand Control Center dashboard.
Step 2 - Navigate to White Label Settings
Go to: Dashboard > Publish Brand Community > White Label Settings

Step 3 - Configure Your Domain
Inside White Label Settings, define your domain for:
- Production environment
- QA environment
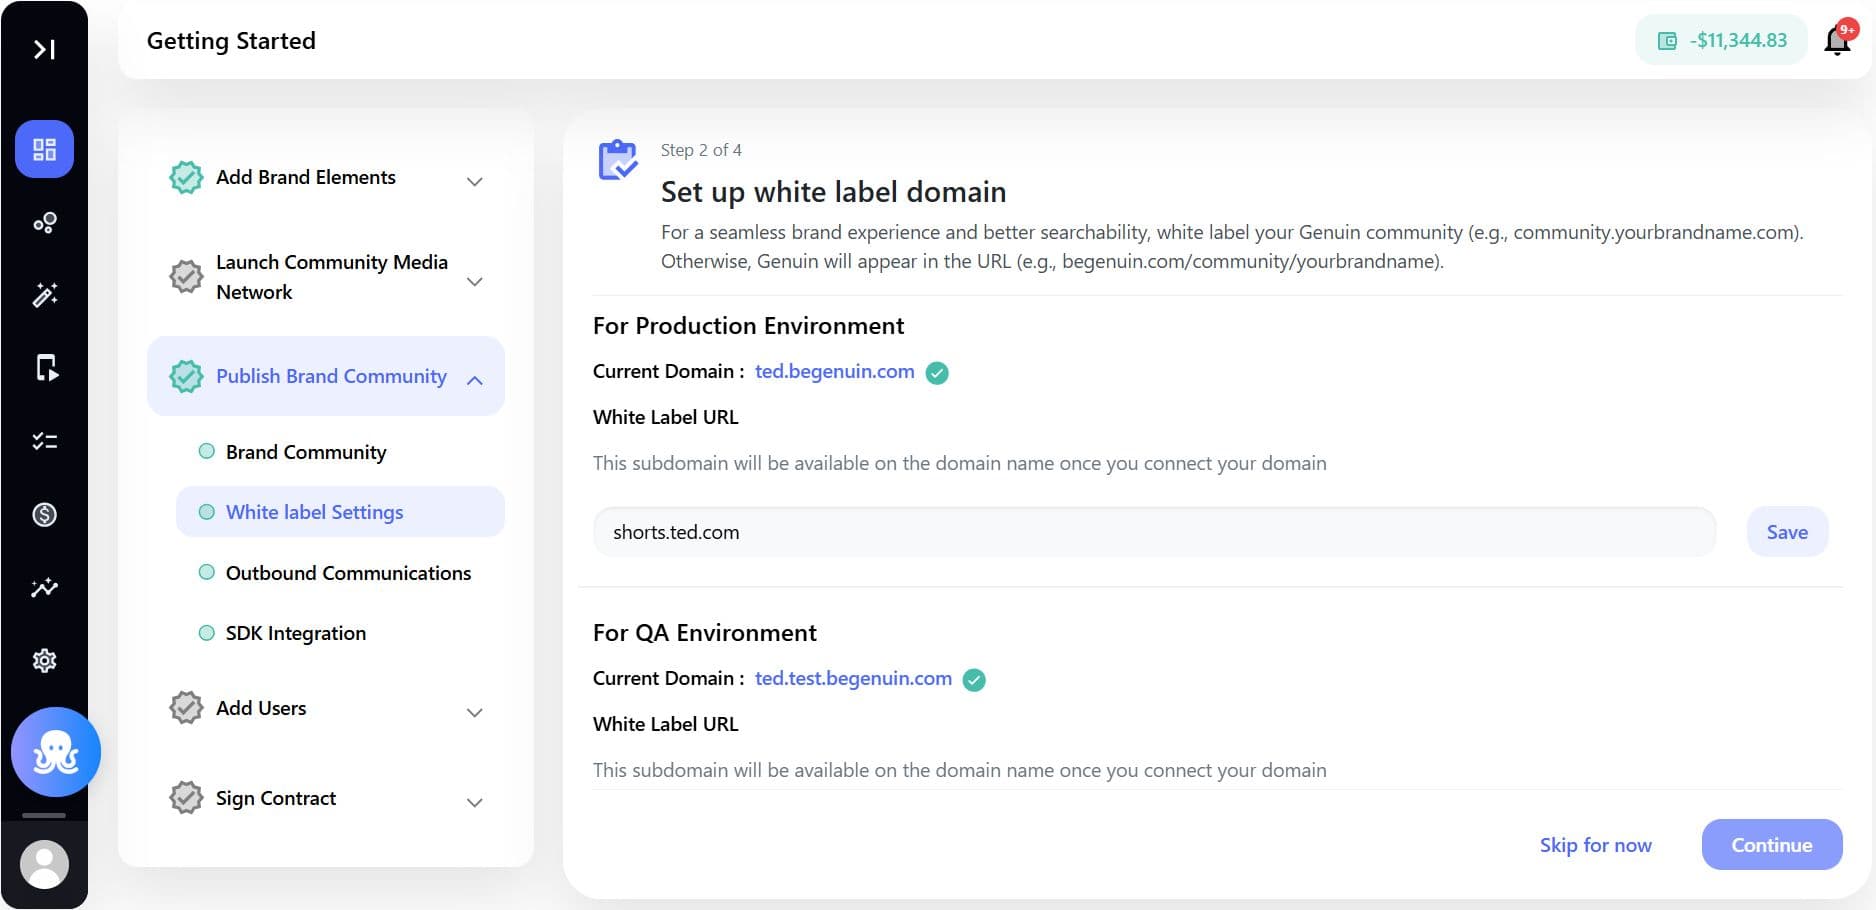
Make sure both environments are properly mapped before going live.
Important Note
Ensure your domain is correctly connected and verified before publishing.
Incorrect DNS configuration may delay deployment or impact accessibility.
How White-Labeling Fits Into Your Network Strategy
When you white-label your community:
Brand owns domain > Community lives under brand > Users stay inside ecosystem > Data stays with you
This strengthens long-term audience ownership and revenue potential.
What to Configure Next
After enabling white-labeling, most teams move to:
- Configuring onsite feed placements
- Activating monetization settings
- Setting up outbound communications
- Final QA validation before launch
Your community is no longer just hosted, it’s fully branded and owned.
