How do I manage network invitations, content access, and brand relationships?
Managing brand relationships effectively is critical to maintaining a healthy Community Media Network. The Network Management tools allow administrators to track invitations, manage content-sharing permissions, update relationships, and maintain a complete history of partnership activity.
This helps you:
- Control who can access your content.
- Track invitation status and partnership history.
- Manage active and pending brand relationships.
- Expand content access as partnerships evolve.
- Keep network records organized and up to date.
By centralizing relationship management within Brand Control Center, organizations can scale partnerships without relying on manual communication or external tracking systems.
Guide
Access Network Relationship Management
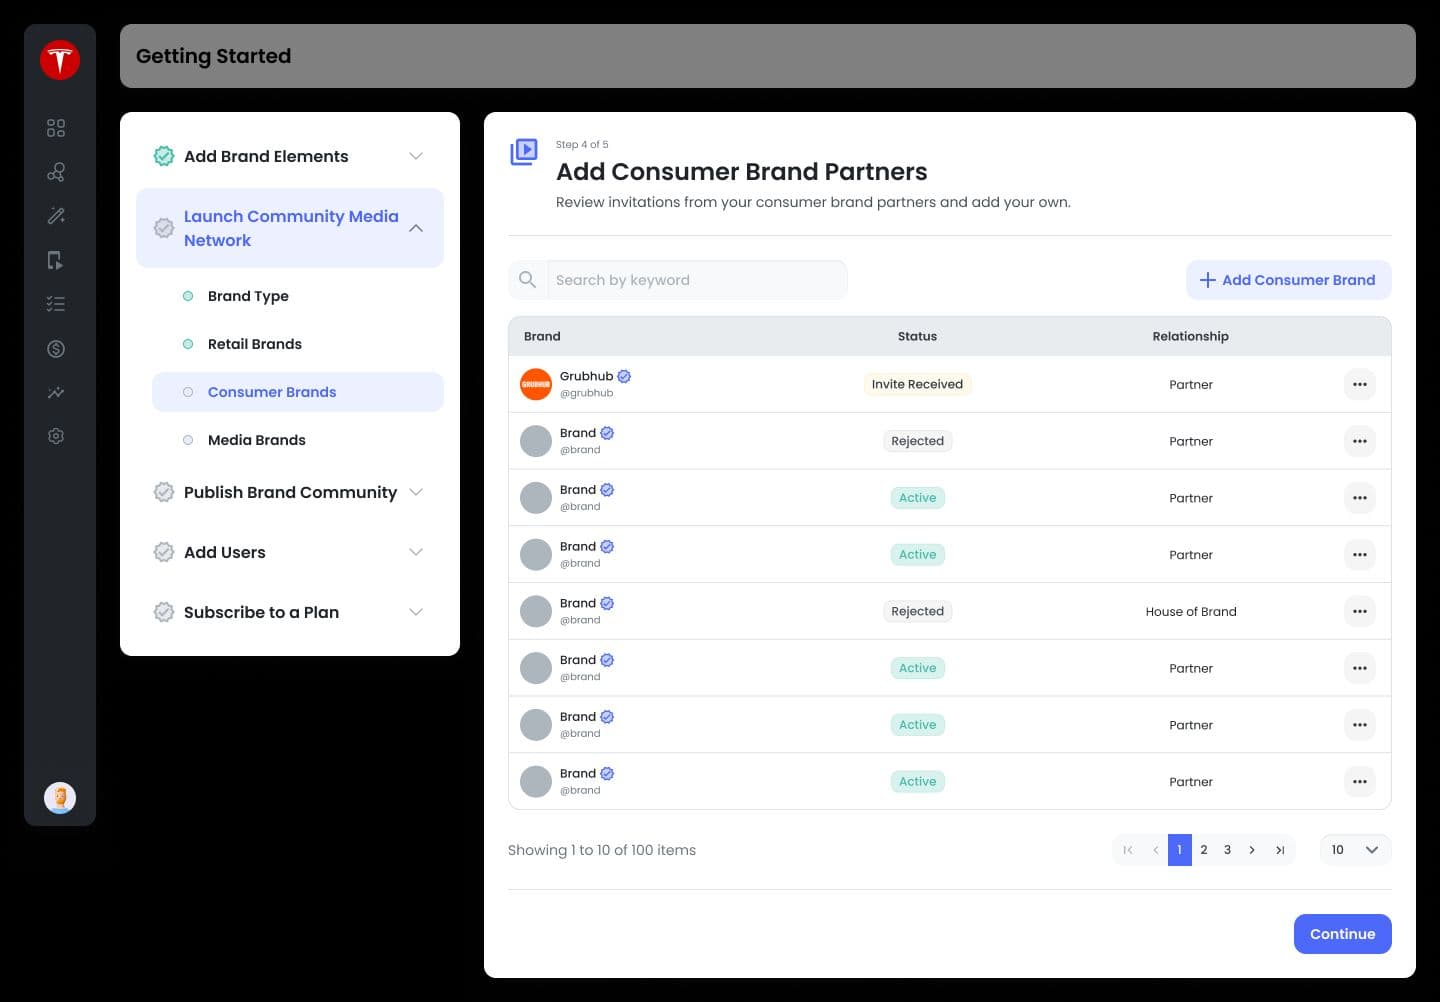
Select the appropriate tab:
- Retail Brands
- Consumer Brands
- Media & Entertainment Brands
The Network table displays all brand relationships and invitations associated with your organization.
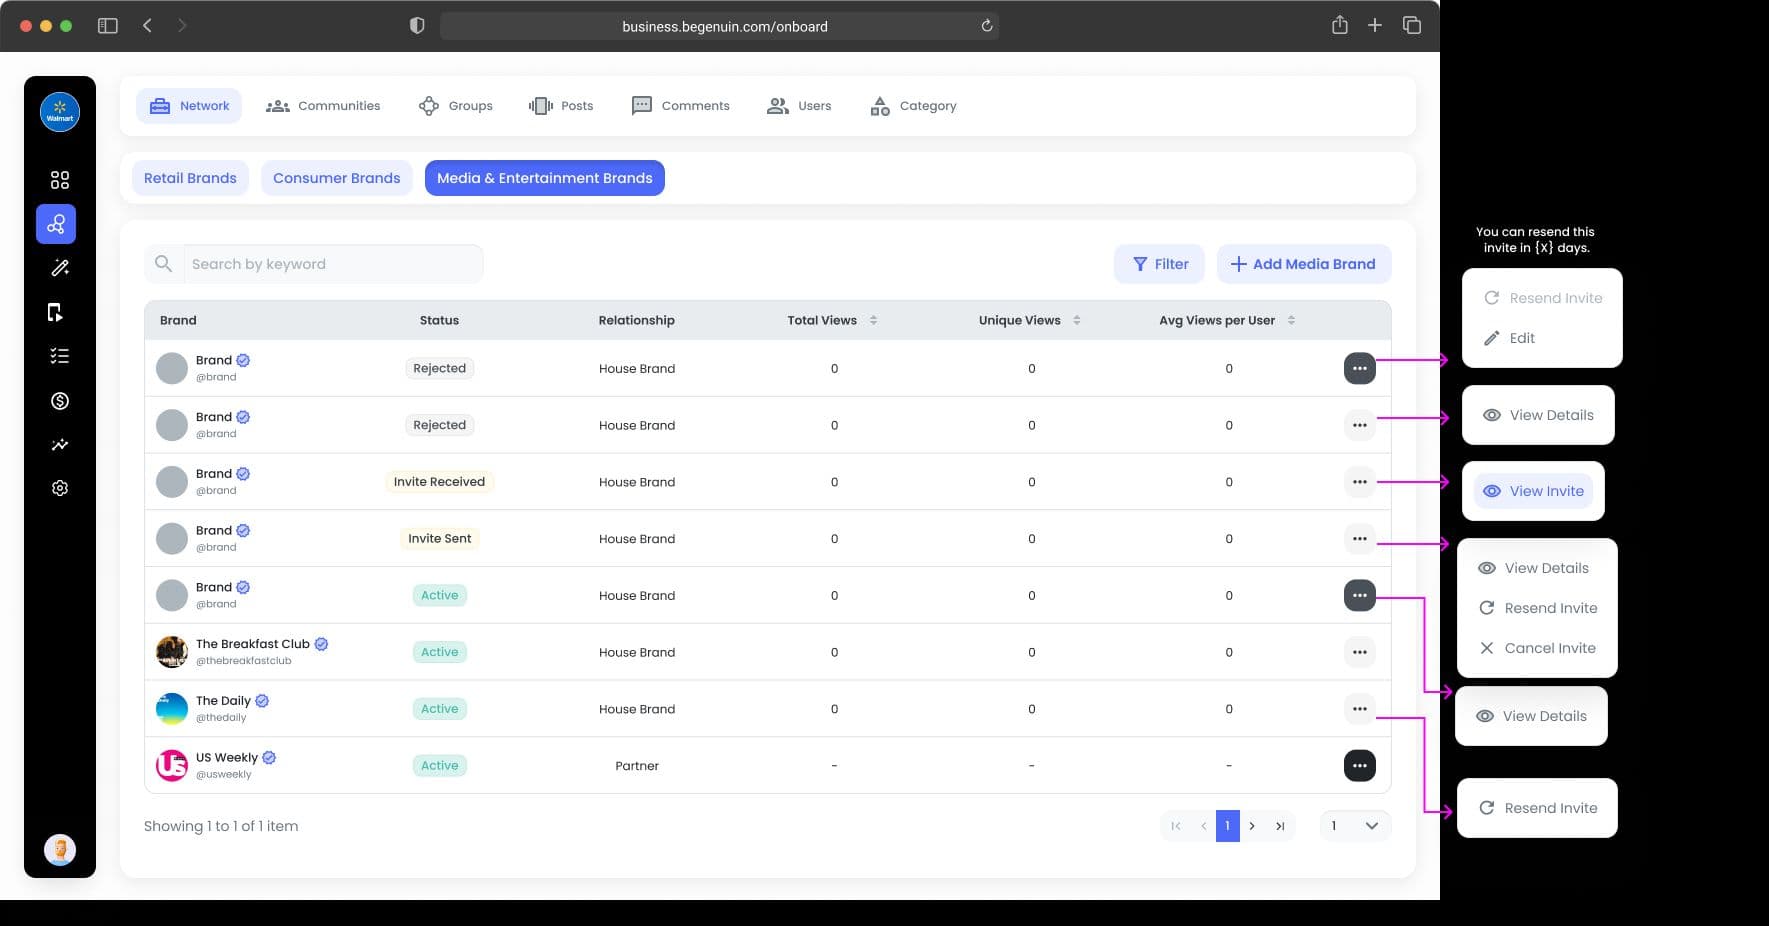
Understanding Invitation Statuses
Each brand relationship displays a status indicating its current stage.
| Status | Description |
|---|---|
| Active | Invitation accepted and relationship established |
| Invitation Sent | Waiting for recipient action |
| Invitation Received | Waiting for your review |
| Rejected | Invitation declined |
These statuses determine which actions are available.
Managing Invitation Received Requests
When another brand invites your organization into their network:
- Navigate to Manage > Network.
- Locate the invitation.
- Click the three-dot menu.
- Select View Invite.
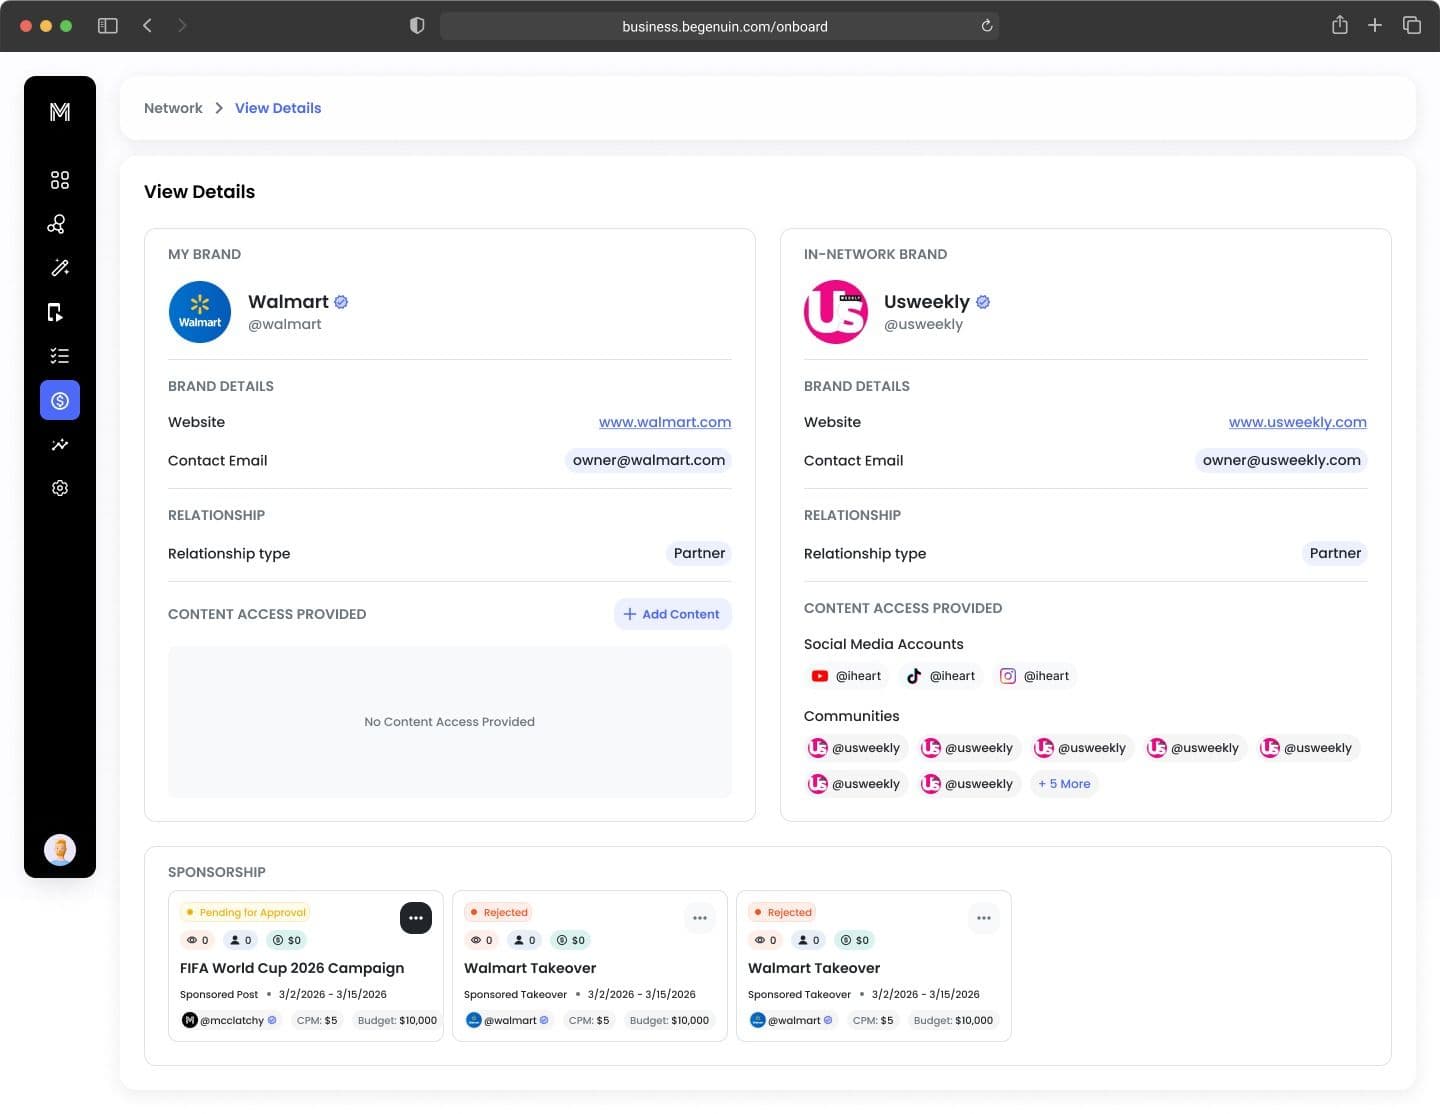
The invitation details page displays:
- Brand information
- Relationship type
- Requested content access
- Shared content access
- Invitation history
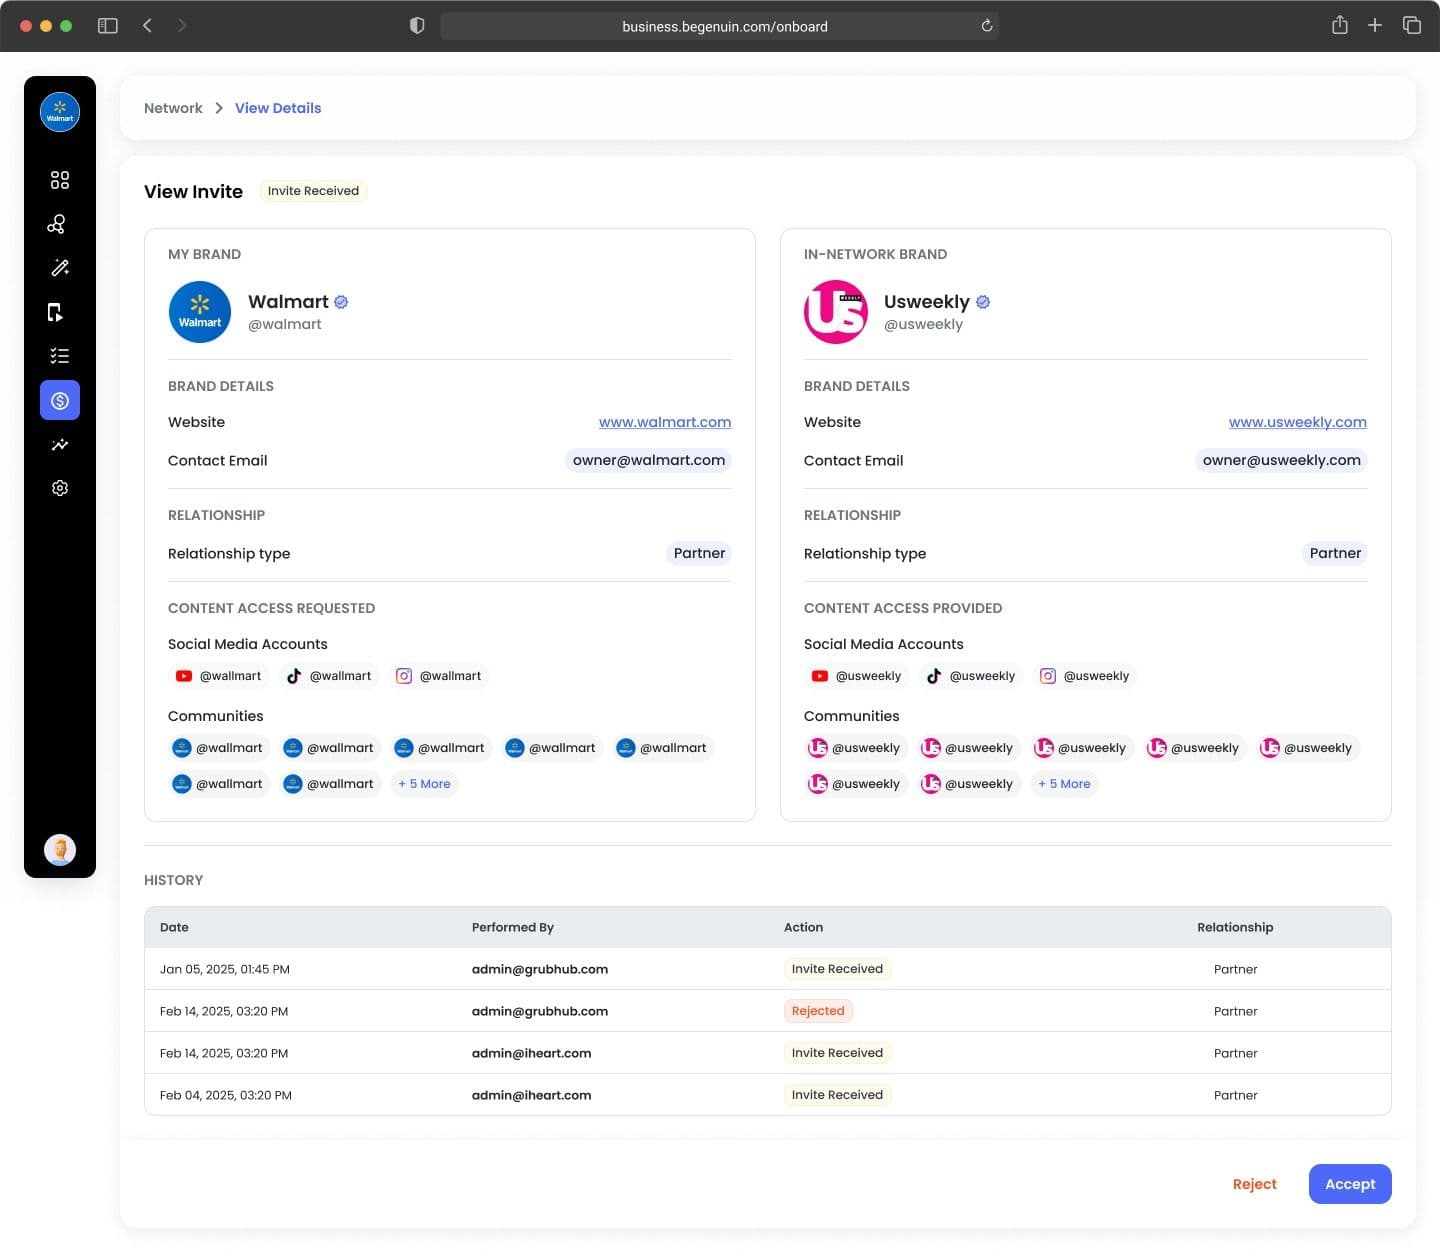
Accept an Invitation
After reviewing the invitation:
- Click Accept.
2. Review the agreement.

3. Confirm acceptance.
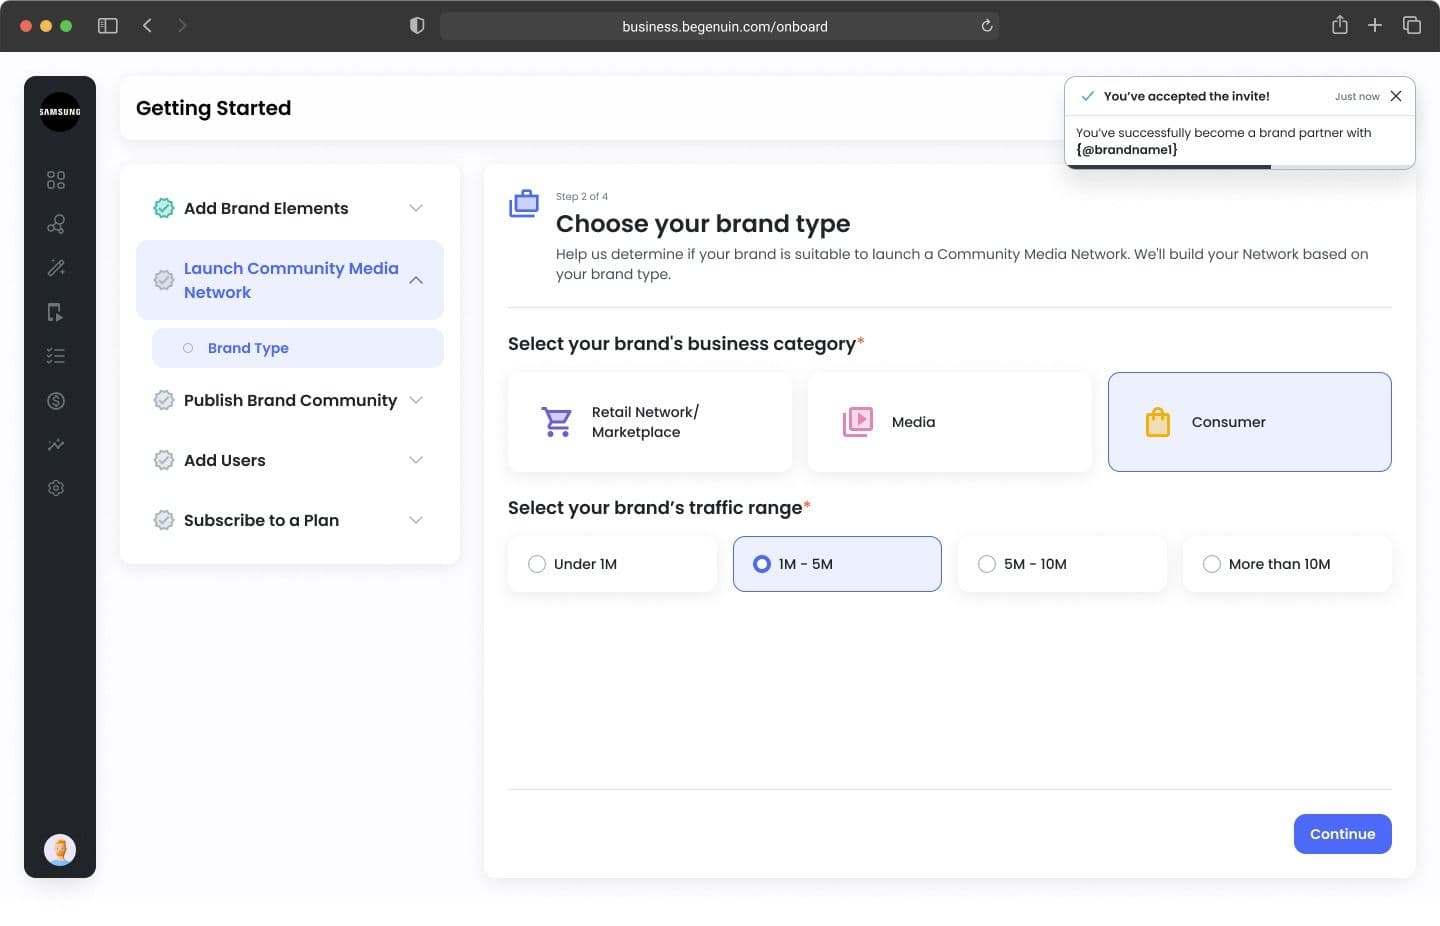
A confirmation notification appears.
The relationship status changes to:
Active
- Both organizations can now begin collaborating.
Reject an Invitation
If the relationship is not appropriate:
- Open the invitation.
- Click Reject.
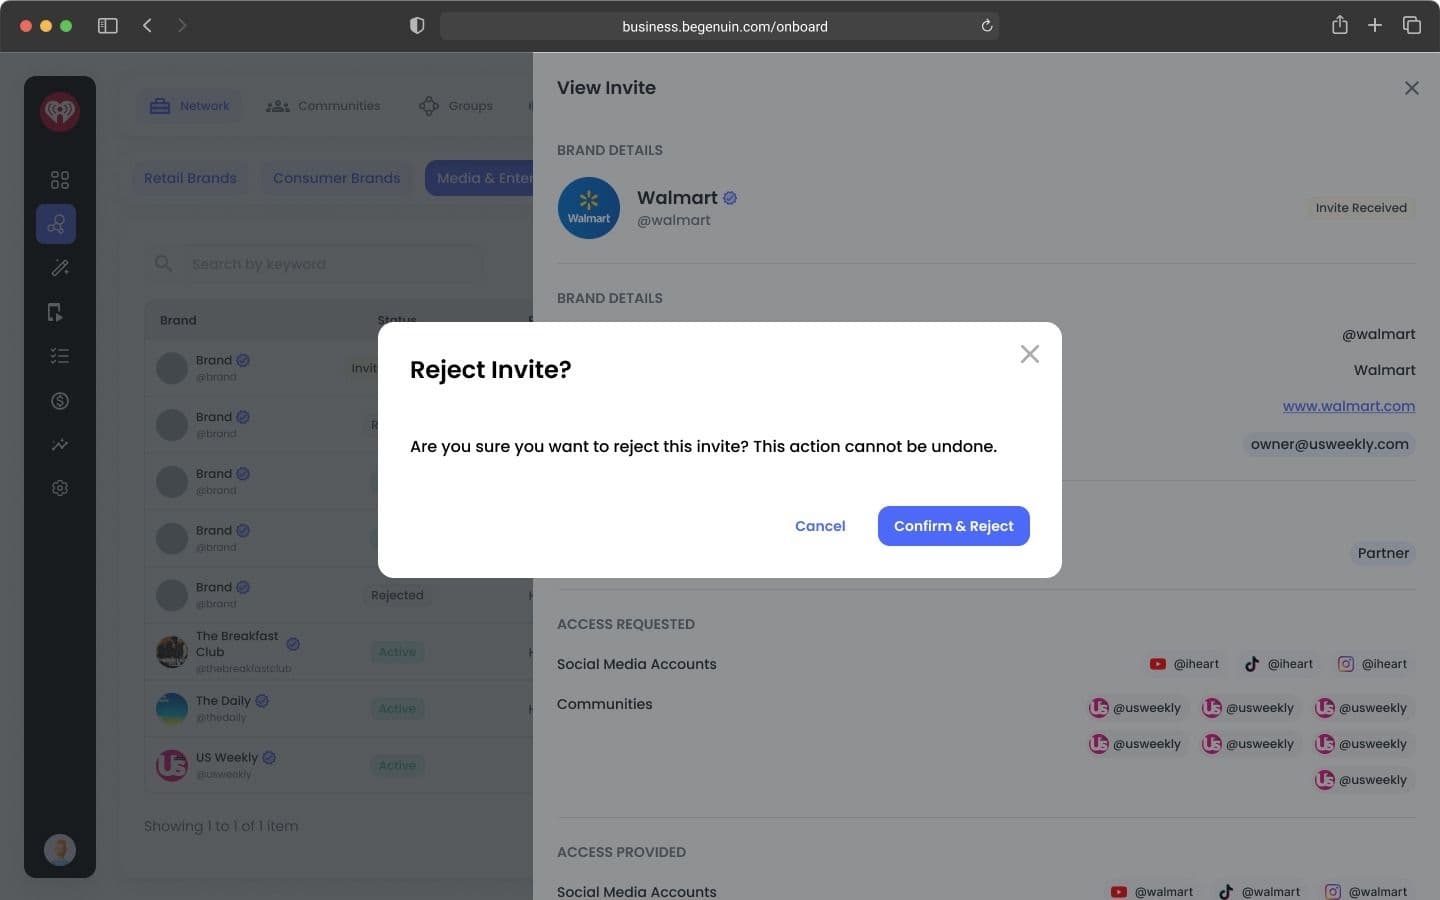
3. Confirm your decision.
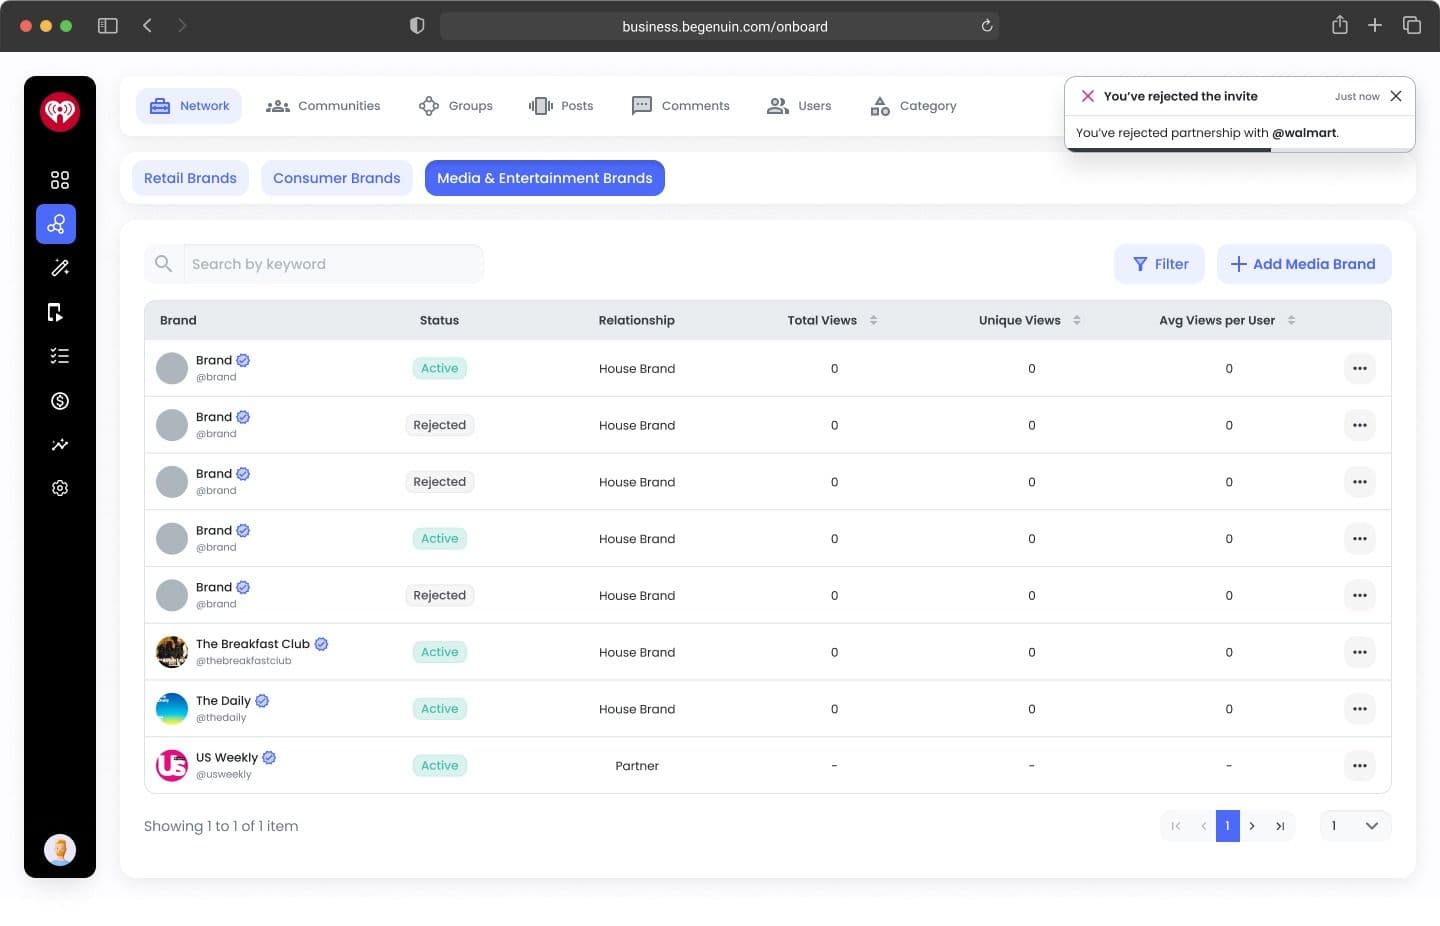
A notification confirms the rejection.
The relationship status changes to: Rejected
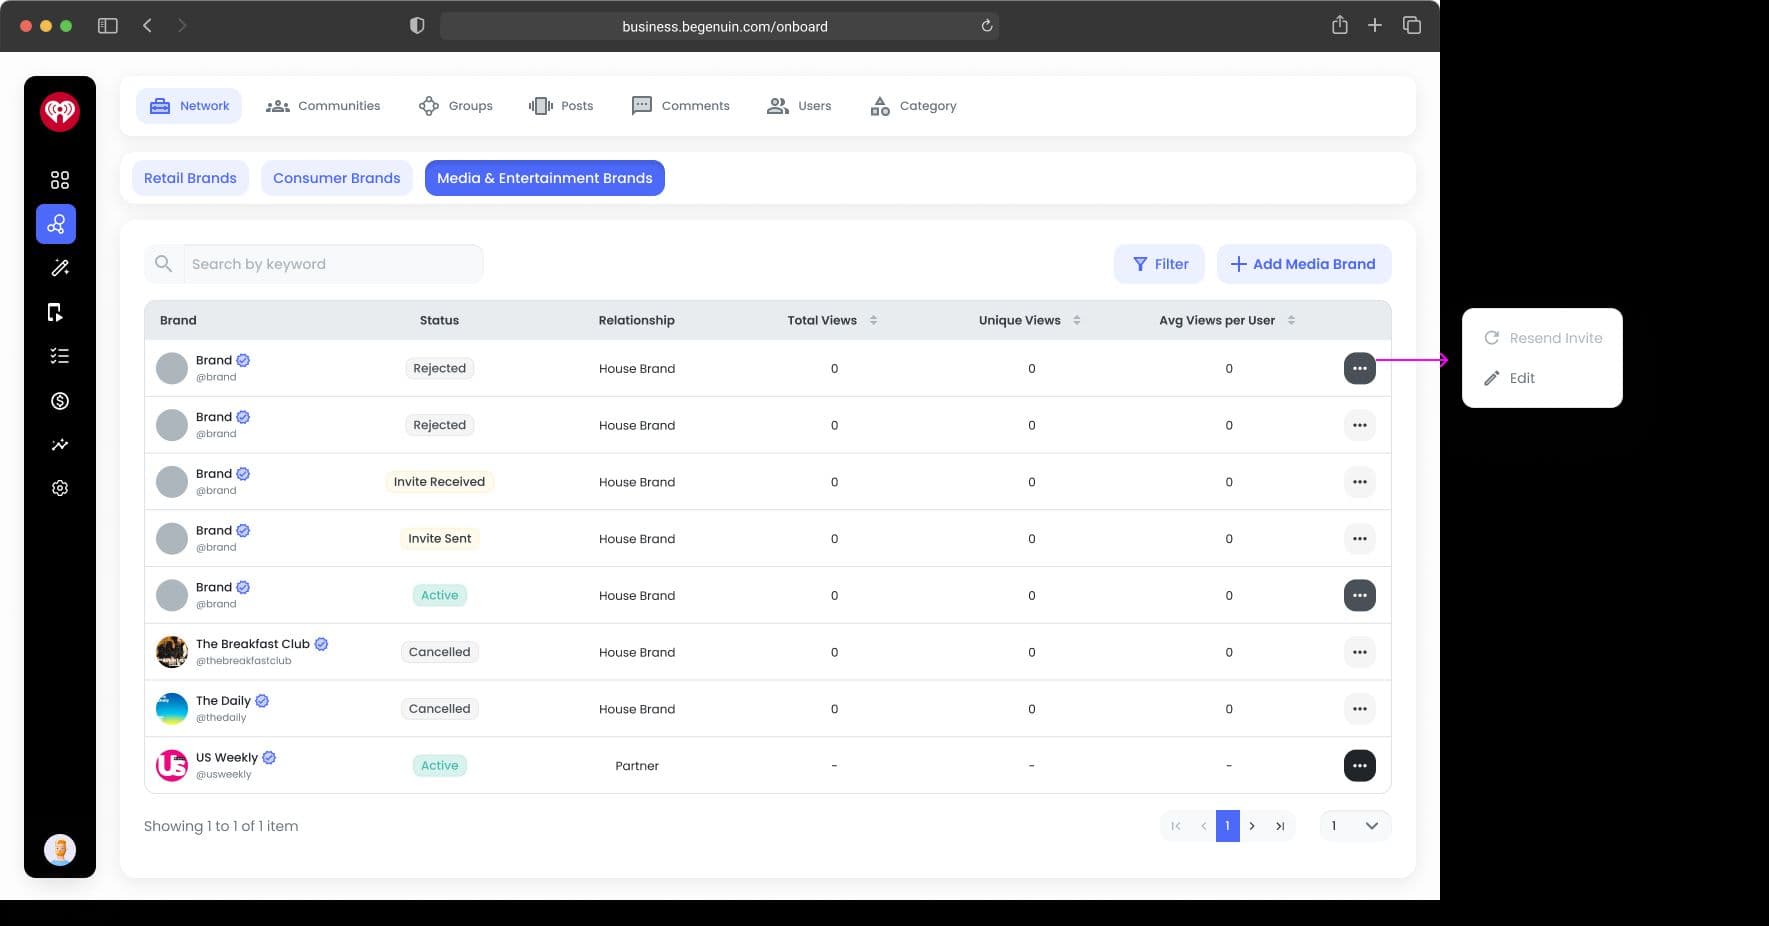
Managing Invitations You Sent
- Navigate to the Network table and locate brands with an Invitation Sent status.
- Click the three-dot menu to access available actions.
Available actions include:
- View Details
- Resend Invite
- Cancel Invite
View Details
View Details provides visibility into:
- Brand information
- Relationship type
- Content access configuration
- Invitation history
- Status changes
This is useful when reviewing pending relationships.
Resend an Invitation
Use Resend Invite when the recipient has not responded.
To resend an invitation
- Click the three-dot menu.
- Select Resend Invite.
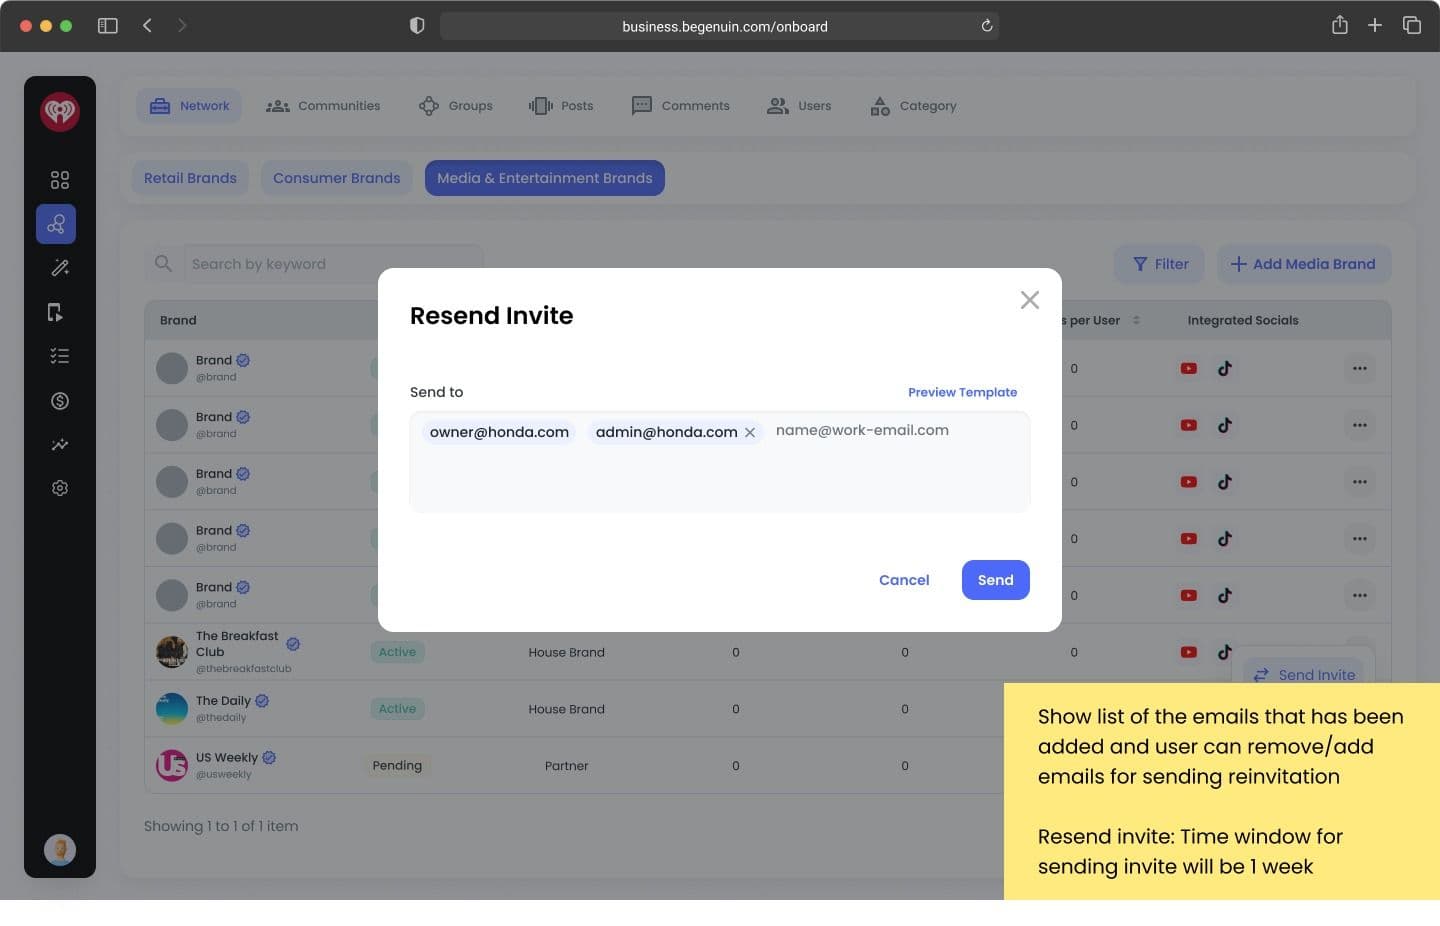
3. Add or remove recipient email addresses.
4. Click Send.
A confirmation message appears.
Notes
- Invitations can be resent within the invitation validity period.
- Multiple email addresses can be included.
- Existing recipients can be removed before sending.
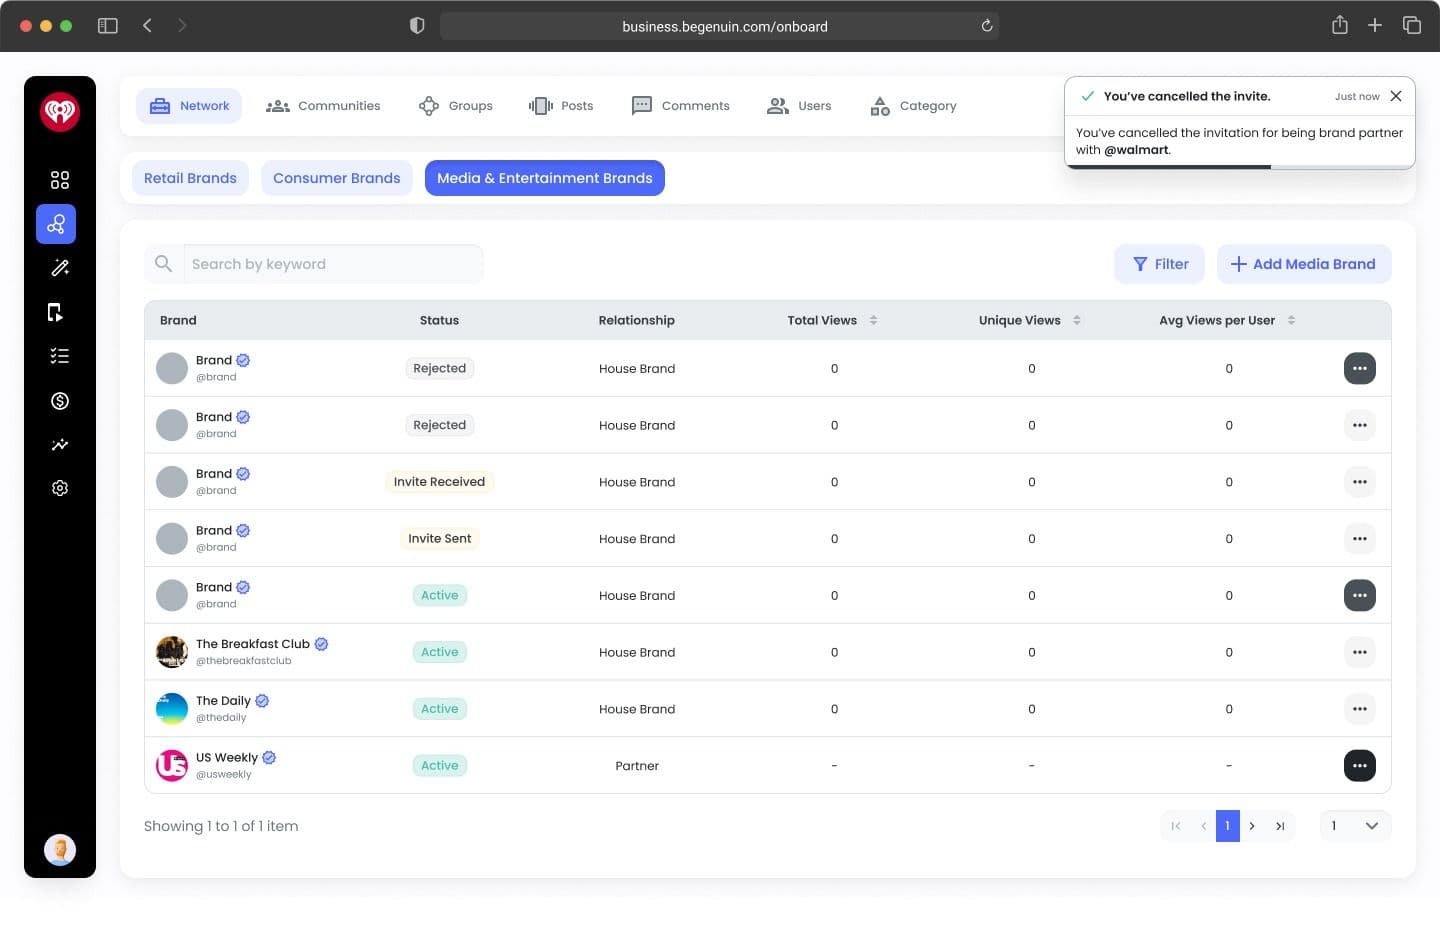
Cancel an Invitation
If the invitation is no longer needed:
- Open the three-dot menu.
- Select Cancel Invite.
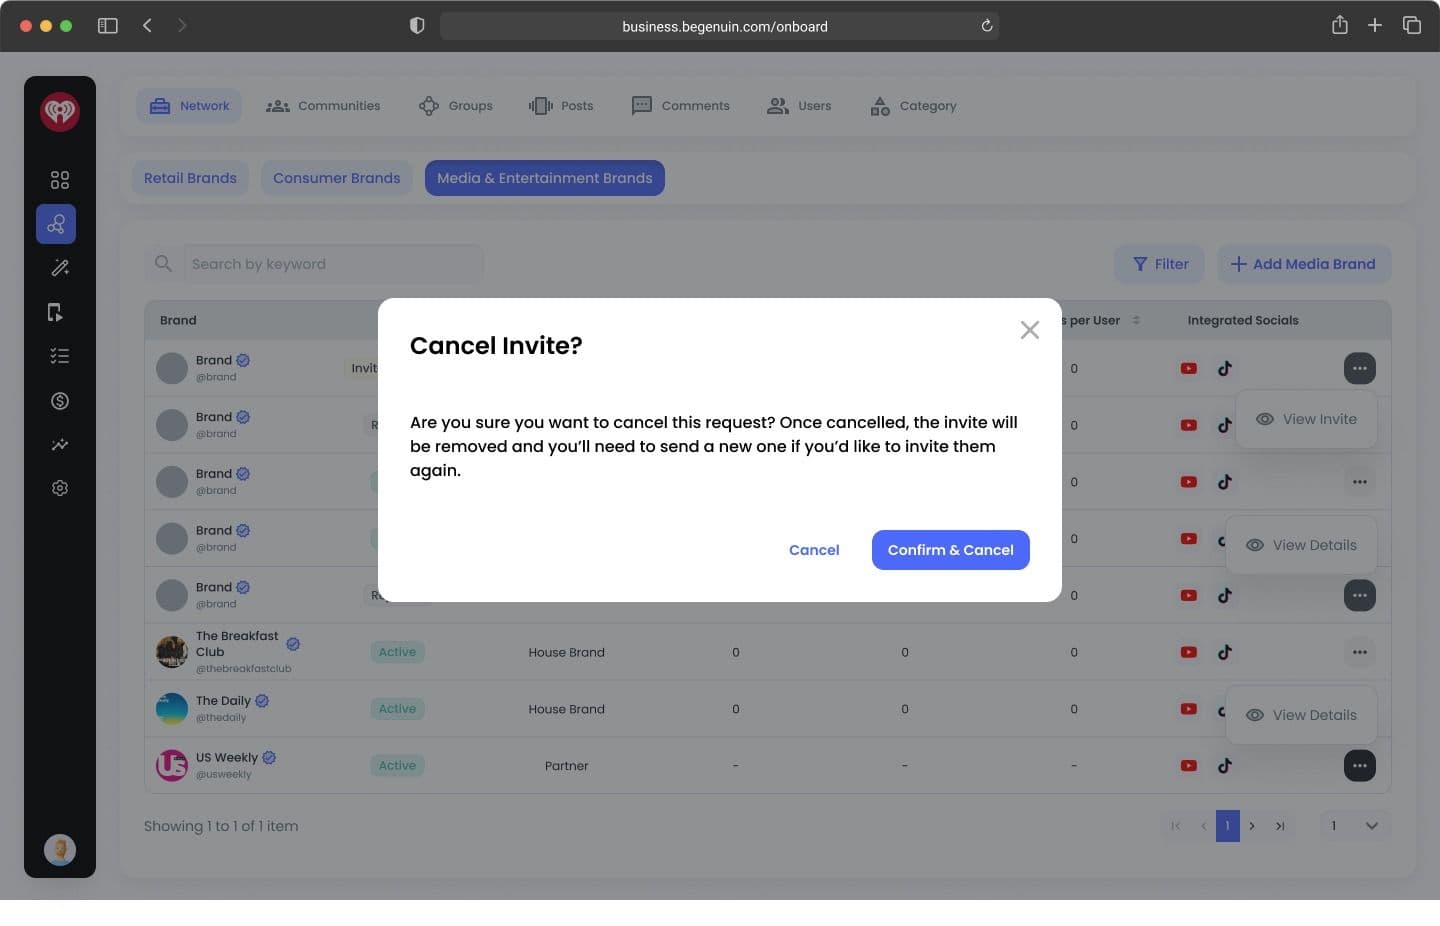
3. Confirm cancellation.
The invitation is removed from the active invitation list.
A confirmation notification appears.
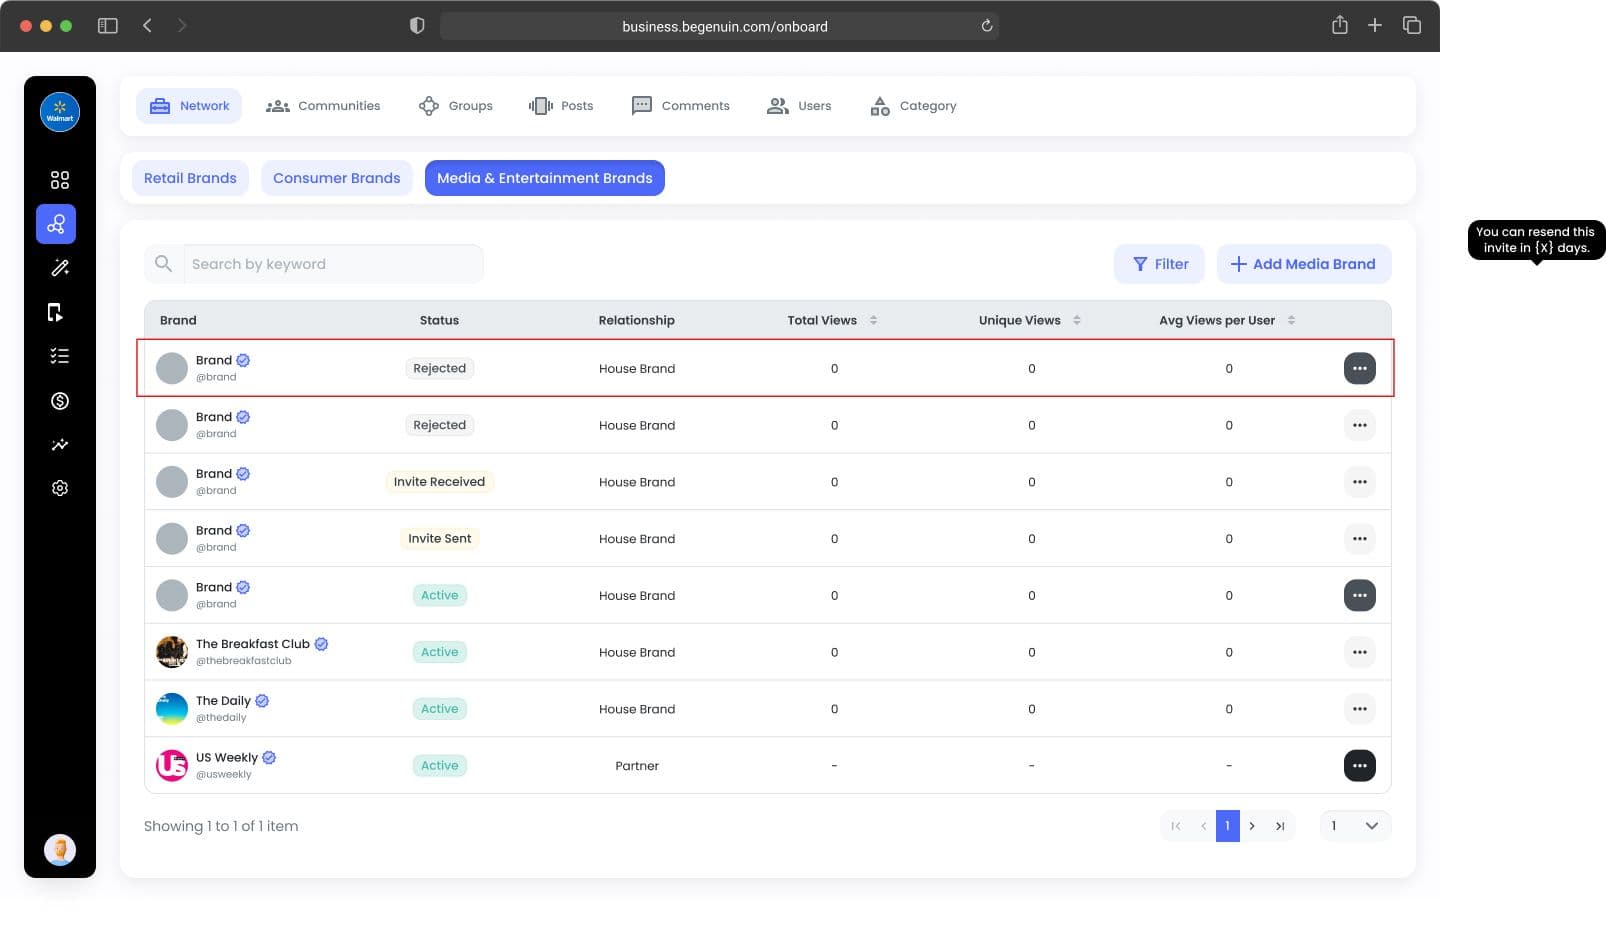
Managing Rejected Relationships
- Rejected invitations remain visible for historical tracking.
- Depending on who rejected the invitation, different actions are available.
Rejected by Recipient
Available action:
- View Details: This allows you to review the original invitation and history.
Rejected by Initiator
Available actions:
- Edit
- Resend Invite
After the cooling period expires, the invitation can be updated and resent.
Edit a Rejected Invitation
If changes are required before resending:
- Click the three-dot menu.
2. Select Edit.
The Edit Brand panel opens.
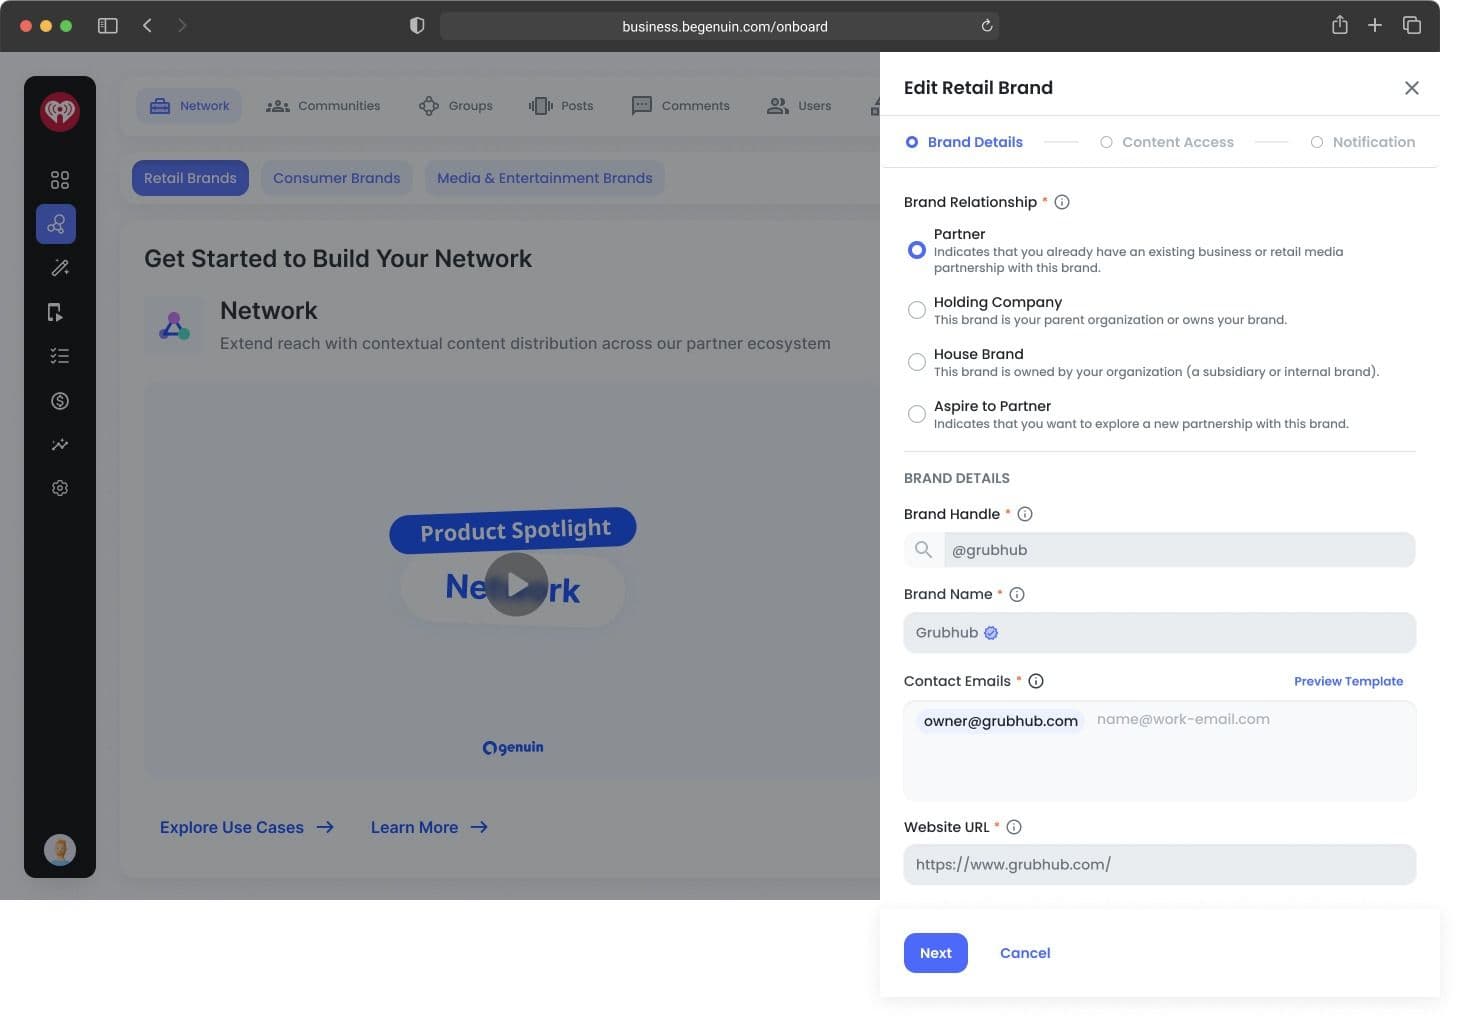
Editable Fields
You can update:
- Relationship Type
- Contact Emails
- Content Access Configuration
Non-Editable Fields
The following fields remain locked:
- Brand Handle
- Website URL
These controls prevent accidental changes to the brand identity.
Update Content Access
As partnerships grow, you may need to expand access.
Within View Details:
- Select Edit Content Access.
- Add or remove:
- Communities
- Social Media Handles
3. Click Next.
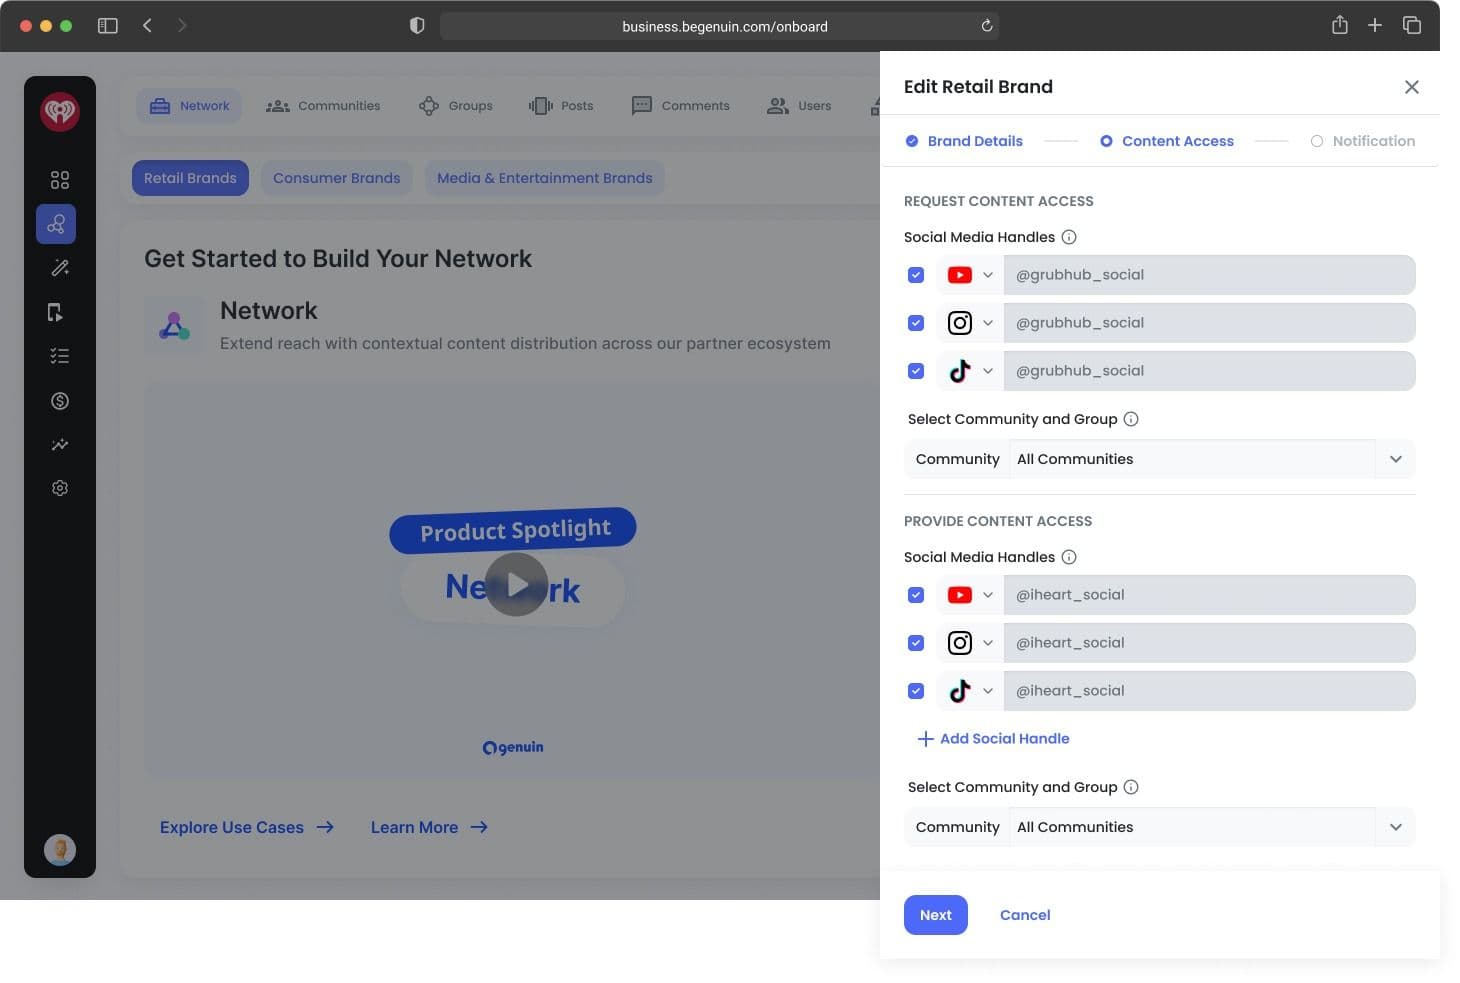
Updated permissions are immediately applied.
Sponsorship History
The Active Details view also displays sponsorship activity between brands.
This includes:
- Sponsorship requests sent
- Sponsorship requests received
- Sponsorship status history
Administrators can quickly understand the full business relationship from a single location.
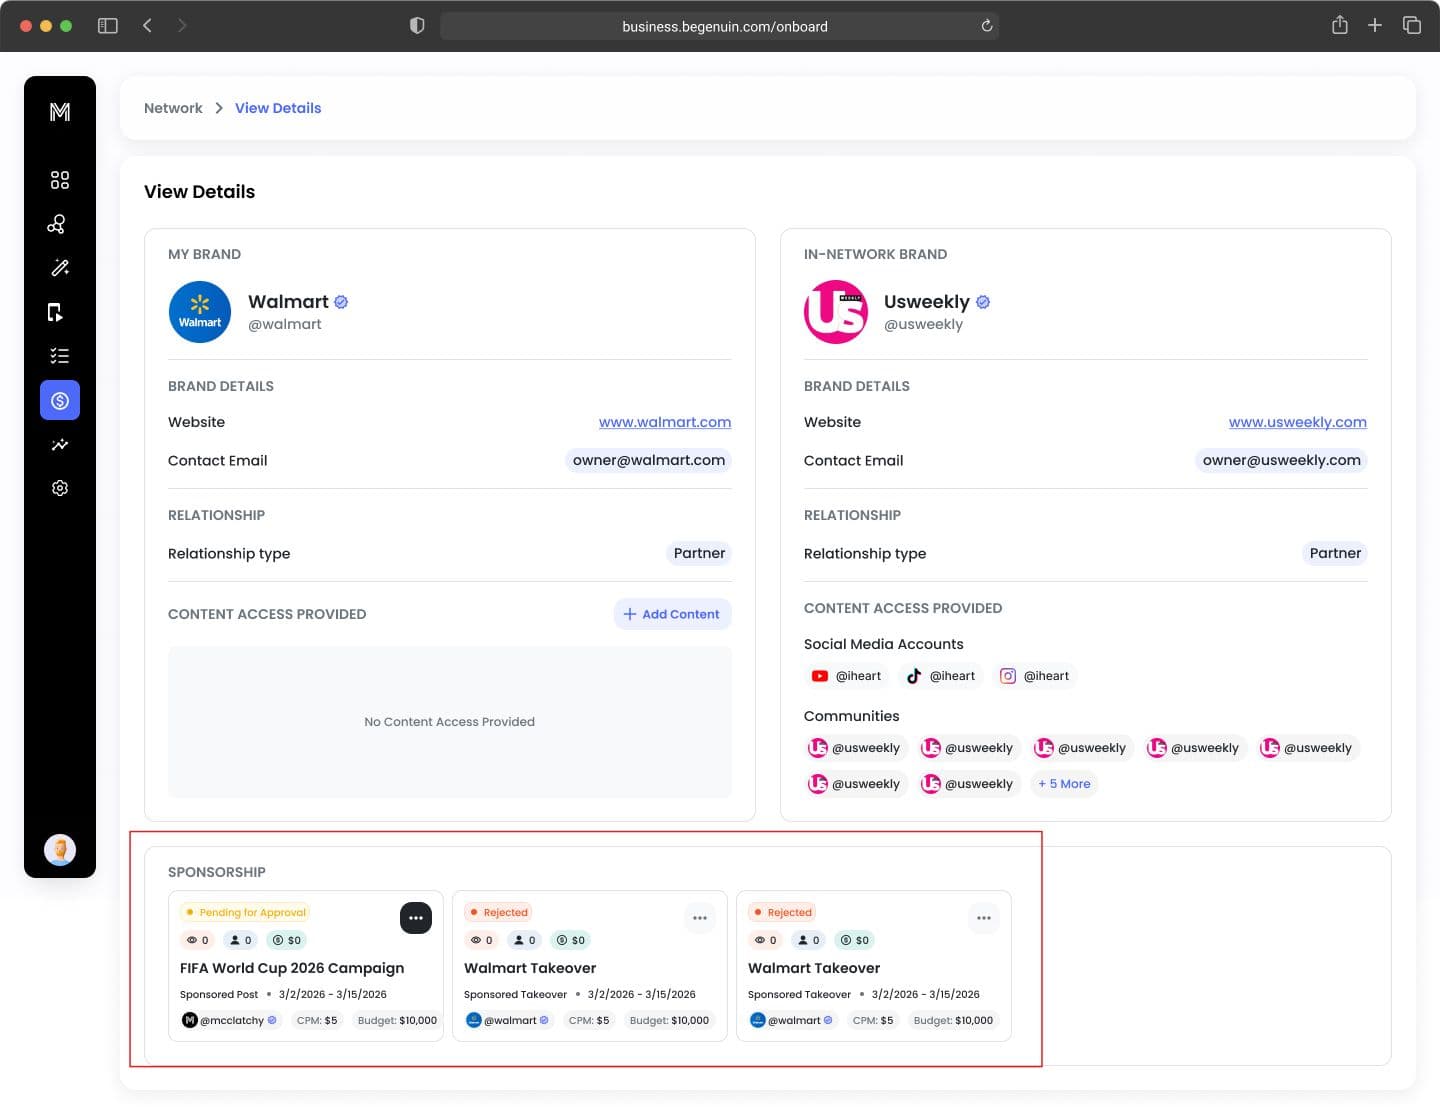
Community Access
Brands can share:
- Individual communities
- Multiple communities
- All communities
The available options depend on the relationship type.
Social Media Access
Brands can grant access to:
- Approved social media handles
- Imported content associated with those handles
Social handles become available after the invitation is accepted.
Automatic Access Rules
- Holding Company Relationships
Holding Companies automatically receive:
- Access to all communities
- Access to all social media handles
Any newly added communities or social handles are automatically shared.
2. House Brand Relationships
- House Brands automatically inherit access permissions provided by the Holding Company relationship.
3. Partner Relationships
- Access is manually controlled.
- New communities and social handles become available for selection but are not automatically shared.
4. Aspire to Partner Relationships
- No content access is granted automatically.
- Permissions must be explicitly configured.
Filtering Brand Relationships
To quickly locate specific relationships:
- Navigate to Network.
- Click Filter.
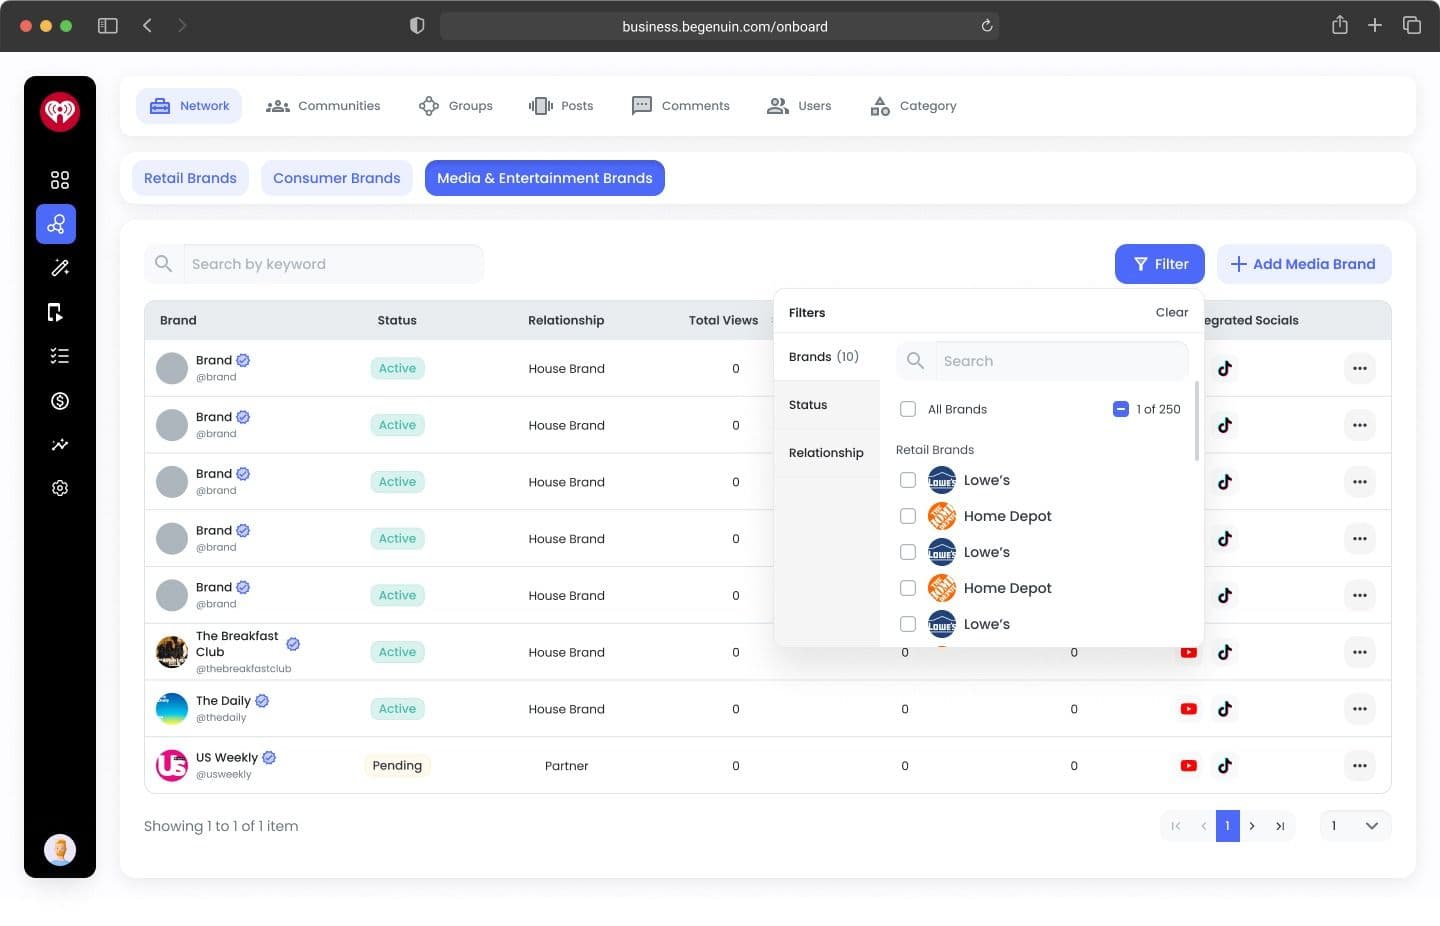
Available filters include:
Brand
Search by brand name.
Status
Filter by:
- Active
- Invitation Sent
- Invitation Received
- Rejected
Relationship
Filter by:
- Partner
- Holding Company
- House Brand
- Aspire to Partner
Filters can be combined for more precise results.
Brand Switching
When a Holding Company or House Brand relationship becomes active:
- Click the brand logo in the top-left corner.
- Select Switch Brand.
- Choose the brand you want to manage.
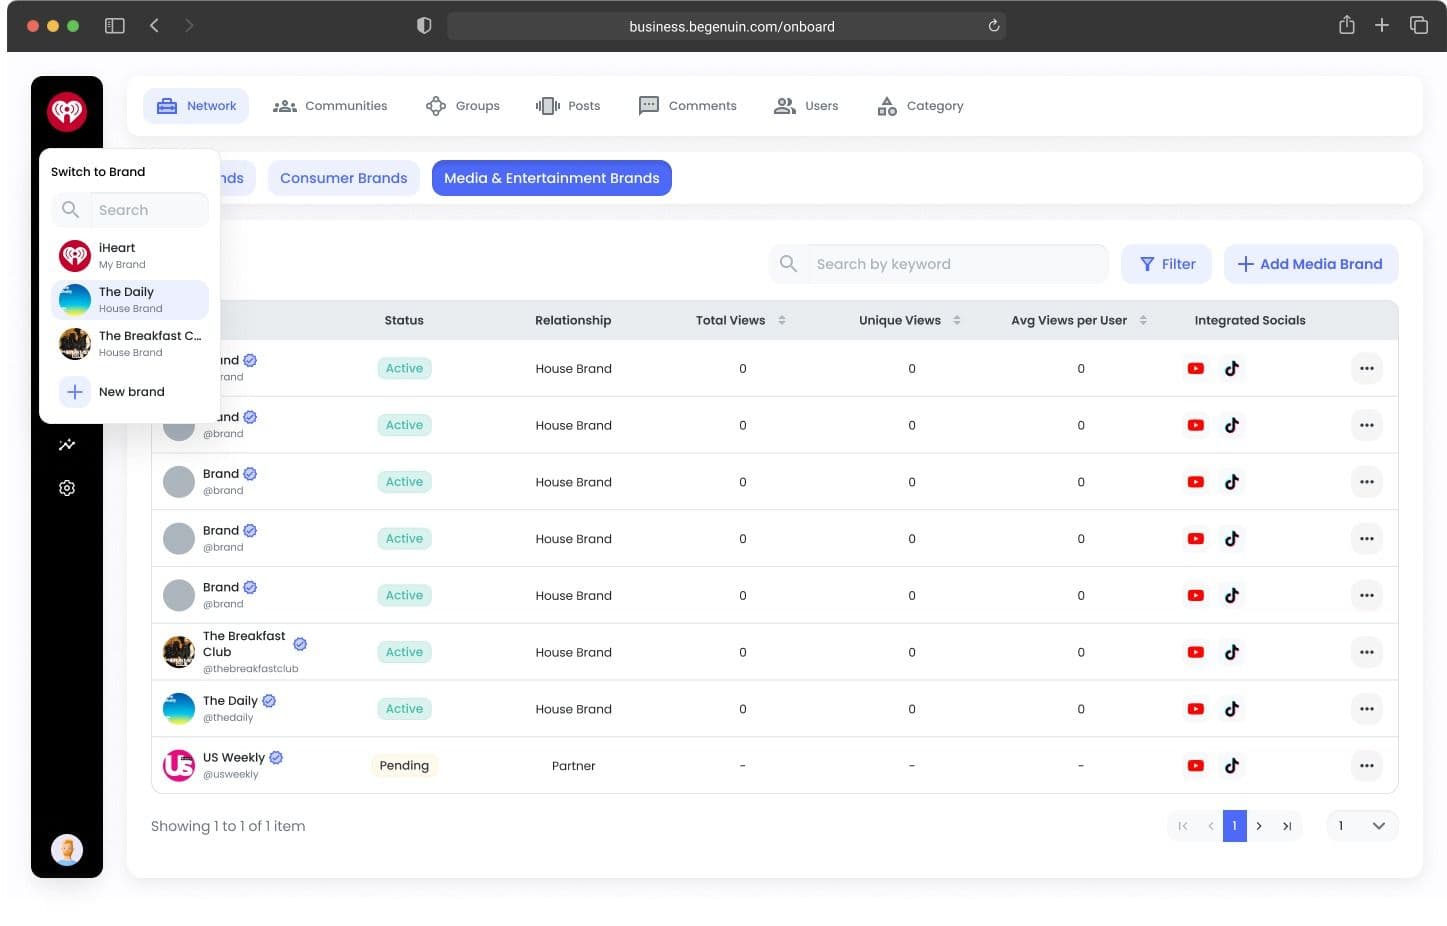
This allows administrators to move between connected brands without logging out.
Notes
- Social handles are only available after invitation acceptance.
- Existing Genuin relationships are automatically classified as Partner relationships.
- Content access changes take effect immediately after saving.
- Sponsorship history is visible for active relationships.
Important
- Rejected invitations cannot be resent immediately.
- A seven-day cooling period applies before a new invitation can be sent.
- Only one Holding Company relationship is supported per brand network.
Specs & Limitations
| Capability | Supported |
|---|---|
| Accept Invitations | Yes |
| Reject Invitations | Yes |
| Resend Invitations | Yes |
| Cancel Invitations | Yes |
| Edit Invitations | Yes |
| Filter Relationships | Yes |
| Update Content Access | Yes |
| View Sponsorship History | Yes |
| Brand Switching | Yes |
| Multiple Holding Companies | No |
| Re-Invite Cooldown | 7 Days |
Example Scenarios
Scenario 1: Accepting a Partnership Invitation
- A publisher receives an invitation from a retailer.
- The publisher reviews the relationship details and accepts the invitation.
- The relationship immediately becomes active.
Scenario 2: Expanding Content Access
- A partner relationship initially included one community.
- Later, the brands decide to collaborate more closely.
- An administrator updates Content Access and grants access to additional communities.
Scenario 3: Managing Rejected Invitations
- A brand rejects an invitation because the relationship type was incorrect.
- After the cooling period, the initiating brand updates the relationship type and resends the invitation.
FAQs
- Can I cancel an invitation after sending it?
- Yes. Pending invitations can be cancelled at any time before acceptance.
2. Can I edit an active relationship?
- You can update content access permissions, but core brand identity fields remain protected.
3. Can I resend a rejected invitation?
- Yes, after the seven-day cooling period has expired.
4. Can I see sponsorship activity between brands?
- Yes. Sponsorship history is available within the Active Relationship Details panel.
5. What happens when I add new communities?
- For Partner and Aspire relationships, new communities become available for selection. For Holding Company relationships, they are automatically shared.
